 Namila Bandara
Server-Client app to Upload and Download using AWS S3 Pre-signed URLs

It’s been a while I wrote a new post about tech. Recently I started to work on this application which needed to upload contents to an Amazon Web Service S3 storage using a pre-signed URL. Uploading to a S3 is bit trick with this pre-signed URL because AWS documentation is a bit messed up for me.
So after completing the task, I wanted to blog a complete tutorial on Server-Client application for AWS S3 Pre-signed URL using Nodejs SDK.
Why am I using Pre-Signed URLs? Pre-signed Urls gives a secured temporarily access to object on S3 bucket. The URL is generated by appending AWS Access key, expiration time, query params to S3 objects and other headers. By using this we can give programmatic access to a download or upload an object.
In this tutorial, I’m going to set up a server to generate pre-signed URLs and then create a client application to upload and download objects using the generated pre-signed URL. I’ve tried to write this tutorial from the beginner level, so anyone can understand the process. If you want to skip the beginning and move from S3 go to Section 3. AWS Controller section. All the codes can be found from my GITHUB.So lets get started.
1 AWS S3
1.1 Intro to S3
Amazon Simple Storage Service (S3) is a storage system where you are able to use it as web service. Here are some key terms in S3.
- Bucket : A container for upload data
- Object : Item stored with in the bucket
- ACCESS KEY : An identification which grants user access to preconfigured resources
- SECRET ACCESS KEY : Secret part of access key.
- Bucket Region : The region where S3 bucket is located
1.2 Key-pair and new bucket
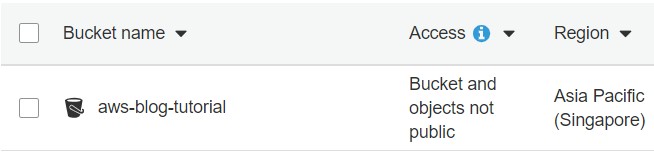
Now we need generate a key-pair from aws and download them. You can follow this docs and generate your key pair for the user account.Then move to S3 and create a new bucket following the docs
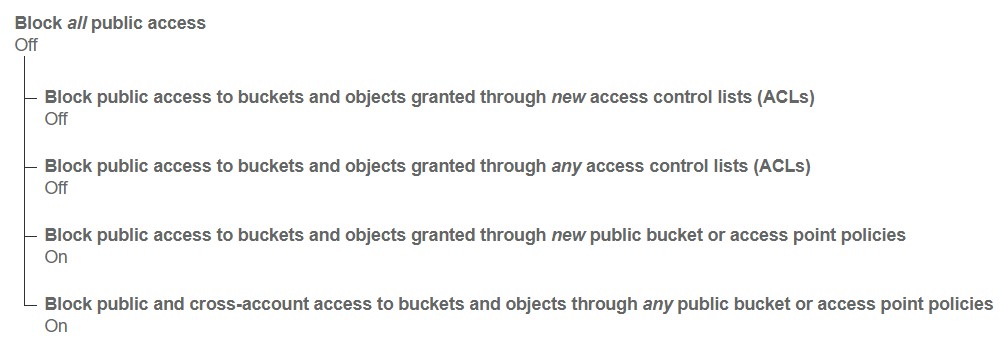
Now we need to do two things; Set up permission and Cors to our bucket. Go to Permissions tab on your bucket and change the Block Public Access as shown in the figure.
Now move to the CORS Configuration tab and paste the following code;
|
|
2 Server
2.1 Basic Setups
To build the server I’m going to use express framework on NodeJS sdk. You can download nodeJs from here. Now initiate a new npm project using npm init and
npm install following npm dependencies for you project; aws-sdk, express, axios, cors, body-parser, dotenv, morgan, nodemon, helmet, http-status-codes. Run the following command to install them;
|
|
nodemon is a perfect tool as it automatically restart the application when it detects a new change on a file. For that, change the scripts in package.json as follows.
|
|
In this project im using dotenv dependency to configure all my variables from one place and export them as a nodejs environment variables. For that create a file called .env on your root folder and add the following to it. (Don’t forget to add your aws keys, bucket and region & DO NOT SHARE THEM) See the all S3 regions from here and use the code for define your region in the .env file
|
|
As we have defined all the environmental variables, we need to initiate them from dotenv and export them as a module. So, we can use the modules variables in our application. (From now on all the app logic is defined inside src folder). For this im going to create a /config/config.js file and export all the env from a module. Copy following code to your config.js.
Now our basic configurations are complete. We move to create app.js entry point of our server application. For this I’m using expressJS framework. If you want to learn about express follow this link
In here i have imported router/router.js and used it in /api/ prefix. So all the router logics will taken place in <server address>:<port>/api/ path. I will move to router once the aws configurations is completed.
2.2 AWS Configurations
Now we need to configure the aws S3 instance, so this application can communicate with the S3, for this aws-sdk is used aws js sdk docs.
Lets define global configuration for the aws-sdk instance, so we don’t need to configure it for every time using it, we can get the configured . Create service/awsS3.js and initiate a S3 instance by adding the AWS ACCESS KEY , AWS SECRETE ACCESS KEY and S3 BUCKET REGION. Finally export the S3 instance as a module. Final code looks like below;
3 AWS S3 Controller
As we have configured our S3 instance, now we can move to the next part. Here we creates a controller, which will do 3 things;
- Create a pre-signed url to PUT an object
- List objects in s3 bucket
- Get a pre-signed URL to GET an object
Before moving to them, create a file as controllers/awsS3Controller.js and import and define followings in the file;
3.1 Put Objects
To upload an object, S3 requires 2 basic params, bucket name and key for the object. In our tutorial, I’m adding some extra params.You can find all the parms supported by the PUT Object docs So this require follow params to continue to generate an URL;
- Bucket: Bucket name to which the PUT operation was initiated.
- Key: Object key for which the PUT operation was initiated.
- ContentType: A standard MIME type describing the format of the contents. ,
- ContentMD5: base64-encoded 128-bit MD5 digest of the message,
- ACL: The canned ACL to apply to the object.,
- Expires: The date and time at which the object is no longer cacheable.
In here I’m using ContentMD5 to make sure the file is not corrupted while transferring through out the network to the S3 storage. For that we need to provide base64-encoded 128-bit md5. Then for each object I can set custom ACL, for each objects I’m using "public-read" as anyone can read the object. Finally a Expires param is introduced to set an expiration to the generated url, after that time period URL is cannot be used for the upload. To generate a URL, we need filename,contentType and contentMd5 from the client application. Below shows the required JSON object which need for this process;
|
|
Below shows the relevant code for generating a Pre-signed URL with contentMd5. You can check JavascriptSDK API for getSignedUrlPromise() from here.
You can see I’ve done a fileObject verification, if any of fields are missing it will throws an error. A key for the object is defined as config.aws.basicPath +fileObject.name with our basic Path and the name of the file. It good have a separate base path for different uploads. Finally the result is sent as a respond object defined in line 18, with the new url path, generated key and the expire time. In the line 24 you can see I have used next(error), I have have written a custom error-handler function to handle error properly. (If you don’t need custom error handlers, just forward the error with as res.send(error))
3.2 List Objects
Now we need to list objects we have saved in our bucket. To access this we are going to use listObjectsV2() (docs). For this we need 3 params as follows (Also read ListObject V2 service docs);
- Bucket : The name of the bucket containing the objects.
- Prefix : Limits the response to keys that begin with the specified prefix.
- MaxKeys : Sets the maximum number of keys returned in the response.
Code is showing below.
In here we retrieve only 5 max keys from the S3. I’ve defined a custom variable respond which removes unnecessary data.IsTruncated will be true if there are more contents. So it will add the current ContinuationToken and the NextContinuationToken to paginate to next list.
If we want to paginate to next list of key set we can set a query param ContinuationToken with the NextContinuationToken we received from the respond. MAKE SURE TO ENCODE THE NextContinuationToken.
3.3 Get Object
As now created functions for put,list objects, now we need a function to handle to GET an object.(GET API reference). To get an object we are generating a pre-signed URL just like in the Put object. Here we need 3 parameters;
- Bucket : The name of the bucket containing the objects.
- Key : Key of the object to get.
- Expires : The date and time at which the object is no longer cache-able.
Here we needs a query param KEY to the object and it will verify if the key contains our base path. So users wont allowed to retrieve contents outside of this base path. It will send respond just like in the PutObject method. (Make sure to URLEncode the key)
Finally export the modules as below;
|
|
3.4 Router Configuration
Now we can define our router as follows;
Explaining the end points;
- Sending a
PUTrequest to the endpoint/uploadrequires afileobject as I mentioned in 3.1 section. This will returns a object with pre-signed url - Sending
GETrequest to the endpoint/itemlistwill return list of object. If you given a query paramContinuationTokenyou can receive list with pagination’s. ie:itemlist/?ContinuationToken=<URLENCODED NextContinuationToken>ie:1 2 3 4 5 6 7 8 9 10 11 12 13{ "IsTruncated": true, "Contents": [ { "Key": "aws-s3-tutorial/aws-key.png", "LastModified": "2020-06-05T21:43:47.000Z", "ETag": "\"4fec15778969db0a96220ecb8e23d4cf\"", "Size": 38689, "StorageClass": "STANDARD" } ], "NextContinuationToken": "1uJx2FtbaQ8eq/FC8QYpgZ1AlACwuN6xfyKDCWpi9gwXb+b++jDqRdiy+v6dgHg50iOEt+zSQu+AfGHt3V1XWPg==" } - Sending a
GETrequest to/itemwith a query paramKEY, will return pre-signed url. ie:/item/?KEY=<URLENCODED KEY>
Now You can run your server by npm run start command 😃. Now lets move to client which handles the upload
4 Uploading Client
Fist of all create a new folder for client in the root folder and init a npm project. Then install axios using npm i axios --save.In the upload client we need to do following things to upload an object to the S3.
- Send file information and generate a pre-signed URL from the server
- Upload the file using the generated pre-signed URL
4.1 Generating a Pre-signed URL
As mentioned in the 3.1 section we need to generate a base64-encoded 128-bit MD5 and send to the server. MD5 can be generated using the crypto library where filebuffer is binary data buffer of the file.
|
|
Now we can send our request to the server to generate a pre-signed url using axios library (axios docs). Using axios we are sending put request to the endpoint /api/upload in our servers. This will return an object containing pre-signed url. Function as below;
4.2 Handle Upload to S3
By calling this function we can receive the pre-signed url from the server. Now we need to handle the upload to the server with using a function.
Content-Type and Content-MD5 to Headersput request to the generated pre-signed URL with above mentioned headers and the binaryfile buffer. Code will look as follows;
This will returns http status code if the file upload is
completed without an error. Following shows the complete code to upload.js client.
|
|
Now we can upload an object by calling handleUpload function with filePath, contentType as args.
5 Download Client
As we are done with uploading client, we now move to create a download client using a key. Like in upload client, we have two main objectives; get generated url and download the file using it.
5.1 Generating a Pre Signed URL
Now lets generate a pre-signed url from our server using a key and it will return an object containing the pre-signed url. We can send a GET request to /item endpoint with the key.If the https status is 202 Accepted we can get the object otherwise there is an error so we throw an error.Define the function as follow;
5.2 Downloading the object
As we received the url, we can start to download the file. Here we receive the content in the body as a stream. We can pipe this to a write stream using fs.createWriteStream function. (fs doc). If everything goes well it will return true, otherwise throw an error.
You can find the complete code for download.js from below.
|
|
Now you can use handleDownload function with object key arg to download a file from your AWS S3.
6 Conclusion
In this tutorial I discussed how to create a express server, how to generate pre-signed URLs and how to handle the pre-signed URLs using client application. I tried my best to write this from basic levels so anyone who is just start to code with JS can learn easily. You can find the all the codes from my GITHUB AWS-S3 TUTORIAL REPO. If you got any problems regarding this tutorial please ask in the comment section.Till then do codings 👨💻. See you soon !!!😄😄